I've compiled an assortment of videos that demonstrate the next set of skills that you can use to make more professional looking cakes. Truth be told, I haven't done most of these but I have seen them used (in person!) to create amazing results.
Simple Sugar Flowers
Friday 29 April 2011
Thursday 28 April 2011
Cake Decorating 101 - Part 5: Basic Decorating Techniques
It's a little hard to figure out where to begin with this one. There are so many different ways to decorate a cake! I've chosen things that I feel are both simple, especially if you're just beginning to learn this craft, but also effective so that even if these are the only techniques you learn, you will still be able to create beautiful cakes.
 Cake Design
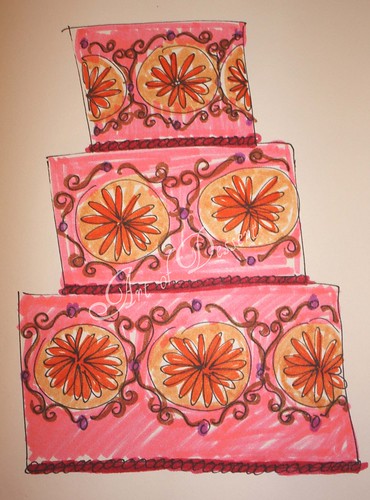 As you look at the images, deconstruct the decorations and figure out if you have the skills to be able to create a specific type of design. There's nothing worse than wanting to create a cake that looks a certain way and then not be able to do it because you don't have the ability! I learned quickly that my piping skills are horribly lacking and because I make cakes on a by-need basis I also don't practice, which means I avoid designs that require piping.
Once you've looked through images, decide which design elements you want to incorporate and what look you want to give your cake. Then do a quick sketch on paper to see if you are able to get the design you're thinking of out of your head. It doesn't matter if you're not an artist, it's just helpful to see your concept on paper because you'll be able to evaluate it from a different perspective.
Once you've finalized your design, gather the tools you'll need and begin!
Cake DesignI would recommend that you start by looking at images online. Use Google Images to search for cakes using key words, for example "girl 1st birthday cake", "retirement cake" etc. Also, most cake designers have websites with galleries full of images. These are also wonderful sources of ideas.
As you look at the images, deconstruct the decorations and figure out if you have the skills to be able to create a specific type of design. There's nothing worse than wanting to create a cake that looks a certain way and then not be able to do it because you don't have the ability! I learned quickly that my piping skills are horribly lacking and because I make cakes on a by-need basis I also don't practice, which means I avoid designs that require piping.Once you've finalized your design, gather the tools you'll need and begin!
Wednesday 27 April 2011
Adventures in Baking: One Bowl Chocolate Chip Banana Bread

One of my sisters stopped in for a visit yesterday afternoon and I always like to have something for people to nibble on when they come over.
I didn't have a lot of time so I fell back on one of my favourite quick and yummy recipes - Chocolate Chip Banana Bread. No beater necessary, mix it all in one bowl and then pop it into the over for app. 55 min. Perfect.
It's moist and delicious with a perfect balance of banana and chocolate.
Tuesday 26 April 2011
Cake Decorating 101 - Part 4: Stacking Cakes
The biggest cake I've ever made was for my cousin's wedding last June. Without the correct support it wouldn't have made it out of the house let alone through the car ride and delivery to the venue!
When you're making a cake with more than one level (tier) I would highly recommend that you use the correct support structure. Otherwise, you run the risk of having cakes that get squished, stop being level, or topple when you move them. Each cake should be on a separate cake board and every tier (other than the top) should be dowelled.
 |
| The cake I made for my cousin's wedding. |
When you're making a cake with more than one level (tier) I would highly recommend that you use the correct support structure. Otherwise, you run the risk of having cakes that get squished, stop being level, or topple when you move them. Each cake should be on a separate cake board and every tier (other than the top) should be dowelled.
Monday 25 April 2011
Cake Decorating 101 - Part 3: Covering With Buttercream or Fondant
The buttercream vs. fondant debate.
Can you tell which of the cakes below are covered with fondant and which ones are covered only in buttercream before they were decorated?
There is often a lot of debate about what type of surface to use on the outside of a cake. If you're interested, I found this wonderful discussion about the merits and drawbacks of each one. In my opinion, especially as a novice decorator , I prefer fondant because it creates a cleaner finish, it tends to be more forgiving, and it holds up better in warm weather. However, in the hands of someone who is skilled, a buttercream finish adds a level of depth to the design of a cake and gives it a completely different feel than those covered in fondant.
Can you tell which of the cakes below are covered with fondant and which ones are covered only in buttercream before they were decorated?
 |
| The cakes on the left are covered in fondant and the cakes on the right are covered in buttercream. How can you tell? Fondant creates rounded edges and a perfectly flat surface. Source: inspiredbythis.com |
Saturday 23 April 2011
Cake Decorating 101 - Part 2: Level, Fill & Ice Your Cake
In some ways, this is one of the most important steps because you're creating the foundation for the shape of your cake and your fondant.
Whenever I bake my cakes come out of the oven with a crown (the rounded part at the top). I have always leveled my cakes by cutting off the crown straight across the top once it has cooled. There are tools to do this, I have a cake leveler (see the picture below) or I've also seen people use a long serrated knife. When I worked for one of Toronto's best cake decorators she used to use an actual level (the tool used in building houses etc.) once she cut the crowns off the cakes. I haven't used a level yet, but then again people aren't paying me to make their cakes!

Whenever I bake my cakes come out of the oven with a crown (the rounded part at the top). I have always leveled my cakes by cutting off the crown straight across the top once it has cooled. There are tools to do this, I have a cake leveler (see the picture below) or I've also seen people use a long serrated knife. When I worked for one of Toronto's best cake decorators she used to use an actual level (the tool used in building houses etc.) once she cut the crowns off the cakes. I haven't used a level yet, but then again people aren't paying me to make their cakes!
Friday 22 April 2011
Cake Decorating 101 - Part 1: Basic Terminology, Tools & Recipes
 |
| Bobbette & Belle Cake One of my favourite Toronto Designers |
I am not a professional cake decorator by any stretch of the imagination, but I have decorated a couple of cakes in the last few years that have managed to turn out pretty well given my limited skills & experience.
I thought it would be helpful to have a set of posts that cover the essentials of cake decorating so that you have a quick reference for an outline of the process, recipes, and techniques.
To begin, here's a snapshot of the steps generally used to decorate a cake:
1) Make your filling & icing 2) Bake your cake
3) Level, fill and mask your cake
4) Cover your cake with icing/fondant
5) Stack your cakes (if you're doing more than one tier)
6) Decorate
Wednesday 20 April 2011
Simple & Delicious Quiche Recipe

Since we're going to have all sorts of eggs (from blowing them out for our Easter Eggs) and a nice long lazy weekend ahead of us, I thought I'd share a simple delicious quiche recipe I found last year. It saves time by using an unbaked pie crust that you can find in the freezer section of the grocery store and I love that it's such a great base that you can replace the type of cheese with whatever you have on hand and then throw in whatever veggies/meat that you feel like!
Monday 18 April 2011
Planning Avery's 1st Birthday: Part 3 - Invite Redesign & Monogrammed Napkins
Invite Update

After seeing the invites that I originally planned to use, DH told me didn't love them. So I went back to the drawing board. Just to be clear, if I'd decided to go ahead with the first ones, he would have accepted that. But I really believe that being in a relationship includes respecting your partner's opinions and in this case, the party is being thrown by both of us for our daughter. Plus, in the new design I was able incorporate my butterfly punch!
The new (and final) invitations still incorporate all of the elements I wanted - polka dots, flowers & butterflies. They're still clean and simple although I think they have more of a traditional feel than what I was originally trying to create.
Saturday 16 April 2011
Beautiful Easter Eggs
I was speaking with my mother yesterday and she mentioned how much she was looking forward to the long weekend coming up. Somehow, I'd forgotten Easter was just around the corner!
Over a month ago I picked up an Easter Egg Decorating Kit but yesterday when the kids were having their nap I wondered if there were some other options that might be eggs-traordinary (sorry... had to!). I had no idea how many wonderful ideas I would find. It turns out that you don't have to settle for one or two colour sloppily dyed eggs.
Starting with the basics, as you may know there are two options for your eggs:
1) Hardboiled - if you plan to eat the eggs afterwards.
2) Blown (where the contents of a raw egg are removed so you're working on the hollow shell) - this allows you to keep your eggs indefinitely provided that they're stored properly each year.
If you're like me and have a hard time boiling eggs without them cracking - check out this guide from simplyrecipes.com. Or, if you'd like to try blowing them out, here's a video from monkeysee.com that shows you how.
Egg Dyeing 101 (marthastewart.com) - These instructions are based on using blown eggs
 Protect your work area with paper towels or newspaper. Mix 1 teaspoon of vinegar and 20 drops of food coloring (use more to intensify color) in 1 cup of hot water in a heatproof bowl, cup, or jar deep enough to let you submerge an egg completely.
**Notice the egg drying rack! It's made of foam board (found at most dollar stores) & straight pins**
Over a month ago I picked up an Easter Egg Decorating Kit but yesterday when the kids were having their nap I wondered if there were some other options that might be eggs-traordinary (sorry... had to!). I had no idea how many wonderful ideas I would find. It turns out that you don't have to settle for one or two colour sloppily dyed eggs.
Starting with the basics, as you may know there are two options for your eggs:
1) Hardboiled - if you plan to eat the eggs afterwards.
2) Blown (where the contents of a raw egg are removed so you're working on the hollow shell) - this allows you to keep your eggs indefinitely provided that they're stored properly each year.
If you're like me and have a hard time boiling eggs without them cracking - check out this guide from simplyrecipes.com. Or, if you'd like to try blowing them out, here's a video from monkeysee.com that shows you how.
Egg Dyeing 101 (marthastewart.com) - These instructions are based on using blown eggs
Protect your work area with paper towels or newspaper. Mix 1 teaspoon of vinegar and 20 drops of food coloring (use more to intensify color) in 1 cup of hot water in a heatproof bowl, cup, or jar deep enough to let you submerge an egg completely.**Notice the egg drying rack! It's made of foam board (found at most dollar stores) & straight pins**
Friday 15 April 2011
Adventures in Baking: Low/er Fat Chocolate Chip Cookies
 |
| Low fat Oatmeal Chocolate Chip & Lower Fat Chocolate Chip Cookies |
I have been ravenous for the last few days and craving chocolate chip cookies. Since I`m not the type of person who just eats one (it`s likely that a batch is gone within 24 hours... yikes!), I thought it might be worth testing out some low/lower fat recipes. I know, they`re still full of sugar but as least one of the two evils has been tamed with these!
The first batch I made is from my Joy of Cooking cookbook. It's a low-fat oatmeal chocolate chip cookie recipe that I modified using a mashed banana instead of oil and fewer chocolate chips to make it even lower fat.
Thursday 14 April 2011
Conversations with a 2 Year Old: Love 'n Toots
Our little guy has been climbing into bed with us since I had to convert his crib to a toddler bed last month. I know that if I want him to stay in bed all night I need to be firm about it... but the idea of getting up to put him back and then having him scream bloody murder just isn't worth it, at least for now. Plus, if I'm really being honest - I secretly enjoy having him sleep beside me at night.
Yesterday morning gave me perfect examples of why I'm not terribly motivated to put him back in his own bed....
Around 6:30am in a sleepy haze I heard "Mommy, I toot on you!!!"
I didn't respond. I was still pretty asleep.
Then 15 minutes (I think) later he snuggled up to me, rested his forehead on mine and put his little hand on my forearm then I heard him whisper "I love you sooooooo much".
My heart melted. It was the first time he'd ever said that to me (un-coerced that is!). I opened my eyes gave him a kiss and told him I loved him too.
Yep, putting him back to bed isn't happening anytime soon.
Wednesday 13 April 2011
Stamp It.
 |
| The Lovely Miss 'M's Napkins |
Her vision was to have the bride's initials and the date of the shower on each napkin. From my experience, there were 2 options. Order one or make your own.
Tuesday 12 April 2011
My Healthy Creamsicle Smoothie

Last night the craving was still there so after my workout I decided to see if I could re-create the deliciousness of a Creamsicle but without any of the guilt :) I have to say I'm pretty happy with the result! It's thick and orange-y and creamy. YUM.
Monday 11 April 2011
Look Great Without Spending a Fortune (Spring/Summer 2011)
I don't profess to be the trendiest person in the world, but I do love beautiful clothes and try to look as put-together as I can. For the last three and a half years I have either been pregnant or had baby weight on me that made it difficult to feel attractive and wear clothes that made me feel good.
I'm SO happy to be back (even minus a few pounds) to my pre-pregnancies weight (sorry, I have to plug my brother's personal training site trainwithgreg.com because I wouldn't be in this shape without him!). I finally feel like I can rejoin the world of women who wear nice clothes, but having two kids also means I have to be smart about how I spend money on myself.
To start this journey I thought it was important to figure out some key trends for this year. After a little bit of searching, I found this fantastic website - fashionising.com that summarized 2011 trends and gave great examples of how to wear them including pictures. (To save you some time, I pulled the most helpful info and pics from fashionising.com and included them below.)
Next, I started to check out blogs like The Budget Babe. I found this site especially helpful because she finds less expensive versions of clothes so you can see a high-low perspective. What I also find really fun is how she takes pictures of celeb outfits and sources more affordable pieces to recreate the look.
Saturday 9 April 2011
Printing on Chocolate & Cookies?!

I was on Facebook for a couple minutes while the kiddies were having lunch and one of the ads caught my eye for The Designer Cookie Boutique & Bakeshop.
I've seen photos printed onto cakes, but I've never seen graphics like these printed onto cookies and chocolate! There are a number of ideas on their site that are wonderful.
Friday 8 April 2011
Planning Avery's 1st Birthday - Part 2: Invitations

My goal was to incorporate the dot, flower, butterfly theme of her cake-to-be and keep the feel pretty but still slightly modern & graphic. I think it ended up feeling more vintage than modern!
Thursday 7 April 2011
Adventures in Baking: The BEST Brownies EVER

As many great discoveries come about, I found the secret to the best brownies by mistake! I doubled my brownie recipe and was trying to adjust the baking time. Based on the old adage, if you don't succeed at first... well I tried, tried and tried again. In the end I had the most wonderful crispy-on-the-outside-smushy-yummy-goodness-on-the-inside brownies.
The secret: Triple baking them. Seriously!
Wednesday 6 April 2011
Conversations with a 2 year old: Grampa
My father passed away unexpectedly last November. My little guy was only 26 months old when it happened. Even though they had spent a limited amount of time together, the time they did spend certainly made an impression because he definitely remembers his Grampa.
Tonight we were reading a story before bedtime and there was a Grampa in the book who looked like my dad...
2 year old: Mommy Grampa awake!
Me: Yes, honey that Grampa is awake.
2 year old: My Grampa sleeping forever.
Me: Yes he is baby. He loved you very much.
... big sigh
Tonight we were reading a story before bedtime and there was a Grampa in the book who looked like my dad...
2 year old: Mommy Grampa awake!
Me: Yes, honey that Grampa is awake.
2 year old: My Grampa sleeping forever.
Me: Yes he is baby. He loved you very much.
... big sigh
Tuesday 5 April 2011
The Lost Art of the Hostess Gift
On Saturday one of my friends brought a hostess gift to our get-together. I was so touched by her thoughtfulness that it made me start to think about how we ( I ) don't do things like that enough. Small gestures that simply say 'thank you' for your time and your effort. I especially like the idea of how much more special a gift like that becomes when it's made by the giver.
I took some time today to try to find a couple great handmade hostess gift ideas. Here are the best ones (I think!). When giving these types of gifts, I'm drawn to things that the recipient can use/consume or are useful in nature. Each of the names are linked to a set of instructions that show you how to make them yourself. I came up with a couple ideas of my own, but I'll save those for a future posting!
I took some time today to try to find a couple great handmade hostess gift ideas. Here are the best ones (I think!). When giving these types of gifts, I'm drawn to things that the recipient can use/consume or are useful in nature. Each of the names are linked to a set of instructions that show you how to make them yourself. I came up with a couple ideas of my own, but I'll save those for a future posting!
Sunday 3 April 2011
Sunday Morning Pancakes
Good morning! Here's a quick & easy pancake recipe. I used to make this all the time and forgot about it until one of my best friends reminded me about it!. It's delicious with a mashed banana, blueberries or cut strawberries.

Enjoy!
Sunday Morning Pancakes
Ingredients:
1 1/4C buttermilk
(to make buttermilk add 1 1/2 tsp vinegar to milk)
1C flour
1tbsp sugar
1/2 tsp salt
1/2 tsp baking soda
Mix & cook.
(to make buttermilk add 1 1/2 tsp vinegar to milk)
1C flour
1tbsp sugar
1/2 tsp salt
1/2 tsp baking soda
Mix & cook.
Enjoy!
Saturday 2 April 2011
Easy Cheesecake Truffles

I stumbled upon this recipe 2 years ago, made it once and hadn't thought about it until the other day. I'm hosting a get-together this evening for a group of my friends and wanted something sweet to balance the savoury nibblies. These are easy, beautiful and delicious.
Friday 1 April 2011
Easter Buckets

I love Easter. Easter egg hunts, chocolate, a long weekend and hanging out with your family. Does it get any better?!
I was in a store last week and bought a little basket ($7) for my daughter and a Spiderman bucket ($7) for my son with the intention of using them for Easter morning.

When I got home I experienced a smidgen of buyer's remorse, not because of the cost but because I was sure I could do it better myself!
Subscribe to:
Posts (Atom)