Showing posts with label do it yourself. Show all posts
Tuesday, 7 February 2012
BodyRockTV - 30 Day Challenge: Week 4... the verdict is in.
I'm completely sold on BodyRockTV. It's an amazing way to add exercise to a busy day and I highly recommend it to anyone who is interested in getting in shape. So... I'm going to share my before and after pics with you. I'm doing it reluctantly, but I'm so impressed with the results after only four weeks that I think the pictures will tell a better story than anything I can write.
Monday, 30 January 2012
BodyRockTV - 30 Day Challenge: Week 3
I haven't done any measurements this week but everything feels tighter and stronger. Plus, one night last week when we were putting Mason to bed, DH stopped and looked at me and said that I looked different... leaner. I was shocked. This is a man who doesn't notice if I have something in my teeth or mascara smeared on my face, so there must something happening for him to say it.
Sunday, 22 January 2012
The 1 Hour Tutu
We were invited to a Superhero & Princess party at the Boulevard club on Saturday. Mason was VERY excited to have his Batman costume back that I made for Hallowe'en and then confiscated a couple days after (to keep it safe & in good condition!).
Avery was Robin for Hallowe'en and although I LOVE her costume, I thought it would be nice for her to be her own person this time rather than part of Mason's dynamic duo.
Princess Avery was pretty easy to put together, a pink bathing suit my mom picked up for her last year, a sweet faux fur shrug trimmed with satin that I found at Value Village, tights, her sparkly pink Tom's shoes that my sister-in-law to be got her for Christmas and a pink tutu.
Monday, 16 January 2012
BodyRockTV - 30 Day Challenge: Week 1
In December I kept seeing images on Pinterest of ridiculously fit women watermarked with a bodyrock.tv logo. When I clicked on a couple of these pins, the pinners' comments beneath the photos kept saying the site had quick but effective workouts.
I know that when it comes to exercise you get out what you put in, but I also know that the workouts I was doing from my brother's site focused on quality rather than quantity and rarely took more than 30 minutes (....mind you, I told him anything more than 30 min probably wouldnt' happen so that may be why mine were short!).
As I mentioned in my first post of 2012, I completely fell off the fitness wagon last year and have been feeling pretty blob-ey. Since my New Year's goal is to focus on doing things that make me feel happy with who I am, getting myself moving and strong again was at the top of my to do list.
Labels:
do it yourself,
exercise,
inspiration
Friday, 13 January 2012
(Re)decorating the kids' rooms: Mason's Room
Like Avery's room, Mason's is also a work in progress. I (sadly) agreed to buy a toddler bed for him to transition him from his crib to a regular bed (my little boy is growing up) near the end of November and that precipitated a number changes to his room.
Labels:
craft,
design,
do it yourself,
easy,
ideas
Tuesday, 10 January 2012
(Re)decorating the kids rooms: Avery's room
We moved into our house in January of 2010 and have done very little decorating other than paint. But painting was necessary because the previous owners, for some reason, thought it was a good idea to paint the ceilings the same colour as the walls in every room. Don't get me wrong, I've seen painted ceilings and they can look beautiful, but ours did NOT fall into that category because every room was a different colour (hunter green, maroon, navy blue, fairy purple, Pepto Bismol-ey taupe) and they'd completed the 'look' with carpet to match. Avery's room was the exception upstairs with a light coloured wood laminate floor. I'm not sure why her room alone had laminate when all the rest were carpeted, but hers was the fairy purple room so I'm not sure if there was much reason in any of their rhymes.
Avery's room still isn't finished, I need to sew a slip cover for her chair, I would eventually like to re-paint her bookshelf and there are odds and ends to add, but it's much better than how it looked at the beginning of December.
Before Avery was born I found this fabric at Designer Fabrics on Queen St. W in Toronto. I fell in love with the sweet nursery rhyme feel of the graphics, the neutral background and pops of colour and it became the foundation of the design in her room.
I used the fabric to sew her crib (set bumper pads, blanket & cushions) and I've tried to mimic the neutral background and pops of colour throughout the room while keeping the nursery rhyme theme without being too literal about it.
You'll probably be surprised at where I've sourced many of the pieces. Over the holidays my brother described me as very 'thrifty', which is true. I'm not too proud to buy second hand. I know how hard DH works for the lifestyle we have and I try to honour his hard work by not wasting money if I can find great (less expensive) options.
Here's a walk around her room...
When you first enter, there's a built-in & reading nook. A comfortable chair with a place to put up my feet was a must for this space, when Avery was born I spent a ton of time feeding and holding her in her bedroom. Now we read stories here every night before bed. I bought this chair on Craigslist for around $30 and once it has a slipcover its clean lines will be the first thing I see rather than the colour.
I love the olive coloured duck & cat ceramic figures beside the chair and have fought to keep them in the room - DH doesn't like them much! The mirror was $10 at Goodwill and the side table & lamp are from Homesense.
One of my best friends bought the beautiful cream piggy bank for Mason when he was born but it looks much better in Avery's room. The fish picture was painted by my Aunt who's an incredibly talented artist and happens to be a perfect match for the green in this room. I love the whimsical vintage bunny driving the carrot race car that I bought on Ebay. He looks like he stepped out of a Wind in the Willows chapter.
You might see glimpses of the chandelier. I bought it on Craigslist and spray painted it the sunny yellow colour that's in the fabric. There's a beautiful store downtown where I'd driven past yellow chandeliers and fell in love with them and jumped at the chance to include one in this room. It makes me happy every time I look at it!
I haven't done much to the space around Avery's crib. The vinyl tree (bought on Ebay) was pretty much the only decorating I did other than the crib set before she was born. I'm hesitant to add anything that she could reach and pull down right now.
The biggest change is in the corner opposite her crib. I found the bookshelf on the curb (yes, I bring trash home sometimes to DH's chagrin!) and loved the shape and size. I knew it be perfect in this space. I think I want to paint it white or cream, but for the time being it still works in the honey finish.
The little rocking chair was left behind in the house when we moved in. It used to be red, but a litle spray paint made it fit right in! The mirror was on drastic clearance at Homesense, marked down to $15 from the original price of $150. It was so perfect for my vision of the room that I couldn't believe I'd stumbled upon it at such a ridiculous price. The bird cage I found at Goodwill, the tree shaped candle holder is from Value Village & the owl is from Dollarama and spray painted a glossy antique white.
The wall shelves are from Goodwill as well. The 'Avery' art was created by my uber-talented cousin and given as a 1st birthday present. The clock doesn't work (boo) but I found it at Value Village the same day I found the beautiful vintage poetry books stacked under the mouse on the shelf below, and loved it because it reminded me of the pocket watch the rabbit carried in Alice in Wonderland. It's perpetually 8 o'clock in Avery's room but I don't care!
- Jacs
Avery's room still isn't finished, I need to sew a slip cover for her chair, I would eventually like to re-paint her bookshelf and there are odds and ends to add, but it's much better than how it looked at the beginning of December.
Before Avery was born I found this fabric at Designer Fabrics on Queen St. W in Toronto. I fell in love with the sweet nursery rhyme feel of the graphics, the neutral background and pops of colour and it became the foundation of the design in her room.
| Sorry for the wrinkles! This is her crib blanket and she uses it every night. |
You'll probably be surprised at where I've sourced many of the pieces. Over the holidays my brother described me as very 'thrifty', which is true. I'm not too proud to buy second hand. I know how hard DH works for the lifestyle we have and I try to honour his hard work by not wasting money if I can find great (less expensive) options.
Here's a walk around her room...
When you first enter, there's a built-in & reading nook. A comfortable chair with a place to put up my feet was a must for this space, when Avery was born I spent a ton of time feeding and holding her in her bedroom. Now we read stories here every night before bed. I bought this chair on Craigslist for around $30 and once it has a slipcover its clean lines will be the first thing I see rather than the colour.
| Our comfy reading chair that needs a slipcover! |
One of my best friends bought the beautiful cream piggy bank for Mason when he was born but it looks much better in Avery's room. The fish picture was painted by my Aunt who's an incredibly talented artist and happens to be a perfect match for the green in this room. I love the whimsical vintage bunny driving the carrot race car that I bought on Ebay. He looks like he stepped out of a Wind in the Willows chapter.
I haven't done much to the space around Avery's crib. The vinyl tree (bought on Ebay) was pretty much the only decorating I did other than the crib set before she was born. I'm hesitant to add anything that she could reach and pull down right now.
The biggest change is in the corner opposite her crib. I found the bookshelf on the curb (yes, I bring trash home sometimes to DH's chagrin!) and loved the shape and size. I knew it be perfect in this space. I think I want to paint it white or cream, but for the time being it still works in the honey finish.
The little rocking chair was left behind in the house when we moved in. It used to be red, but a litle spray paint made it fit right in! The mirror was on drastic clearance at Homesense, marked down to $15 from the original price of $150. It was so perfect for my vision of the room that I couldn't believe I'd stumbled upon it at such a ridiculous price. The bird cage I found at Goodwill, the tree shaped candle holder is from Value Village & the owl is from Dollarama and spray painted a glossy antique white.
The wall shelves are from Goodwill as well. The 'Avery' art was created by my uber-talented cousin and given as a 1st birthday present. The clock doesn't work (boo) but I found it at Value Village the same day I found the beautiful vintage poetry books stacked under the mouse on the shelf below, and loved it because it reminded me of the pocket watch the rabbit carried in Alice in Wonderland. It's perpetually 8 o'clock in Avery's room but I don't care!
I can't describe how peaceful and serene it feels sitting in this room. Maybe it's because the clock makes it feel like time stands still! I know it needs some tweaking and a little more work to make it perfect, but I love it.
- Jacs
Sunday, 8 January 2012
Mason's class Christmas Party
We enrolled Mason in a nursery school last fall after he became best friends with a little boy who was going there. Turns out it was the best decision because he's in a class of 8 little 3 year old boys with a wonderful teacher. He loves going to school and seeing all his friends and it has created in him an amazing sense of independence, accomplishment and has planted the seed for the love of learning.
Fuelled by ideas I'd come across on Pinterest, I think it may be one of the best parties to date. I was also very lucky to find out that one of our new employees was a recent graduate from a college photography program and she came to capture the afternoon. All the pictures that follow are the ones she took. Many thanks to Amanda! (check out her blog Amanda Manners Photography)
Thursday, 5 January 2012
My Pinterest obsession
I love Pinterest. It's true. For the first two weeks after I got my invitation I probably spent 4-6 hours a day on the site. It was so exciting to see a community of women (although it isn't only for women) accumulating beautiful ideas, projects, and above all else, inspiration on one site.
For anyone who hasn't heard of or understand what Pinterest is, it's a place where you create virtual clipboards that categorise information by topic (ie. fashion, diy projects, recipes etc.). So when you come across something amazing online, like your next DIY project or a fabulous workout routine, you pin it! For me, it allowed me to clear out my bookmarked pages and put all the information I had accumulated into a place that made it easier to catalogue and then find the wonderful things that I ran across online. Each PIN on your clipboard is a link to the site you found with a picture (from the original site) that gives you a visual reminder of what you pinned to a specific board, which is SO much better than the descriptions I used to type into my bookmarks!
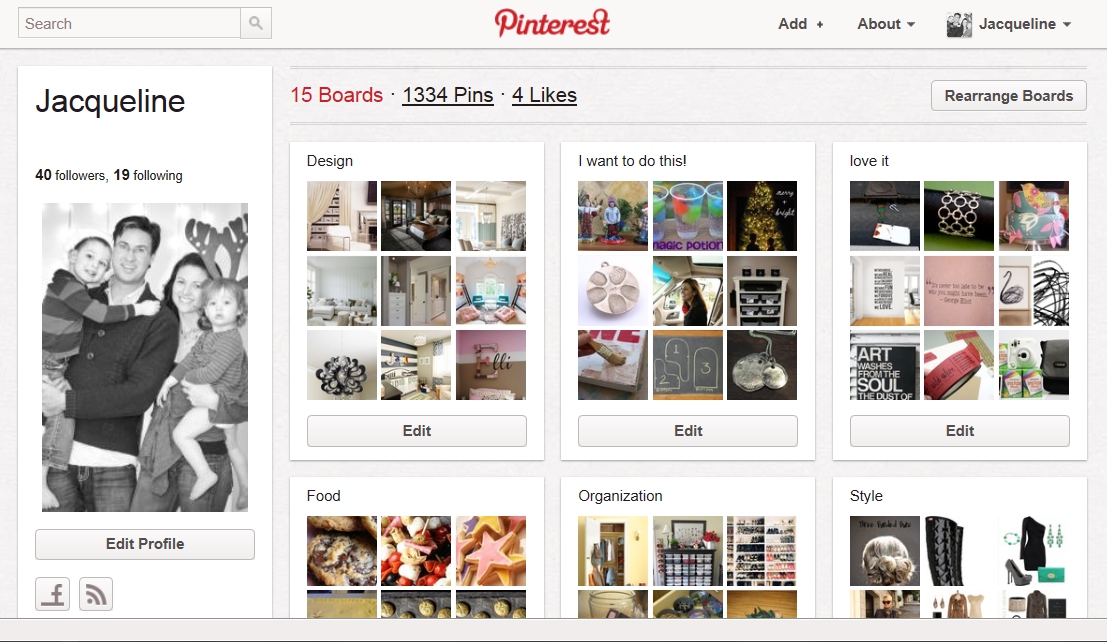
This is my collection of boards on Pinterest. I have 15 boards. The ones shown are Design, I want to do that!, love it, Food, Organization, Style. Each thumbnail is something I've pinned onto the different boards and links back to the site where it came from.
For anyone who hasn't heard of or understand what Pinterest is, it's a place where you create virtual clipboards that categorise information by topic (ie. fashion, diy projects, recipes etc.). So when you come across something amazing online, like your next DIY project or a fabulous workout routine, you pin it! For me, it allowed me to clear out my bookmarked pages and put all the information I had accumulated into a place that made it easier to catalogue and then find the wonderful things that I ran across online. Each PIN on your clipboard is a link to the site you found with a picture (from the original site) that gives you a visual reminder of what you pinned to a specific board, which is SO much better than the descriptions I used to type into my bookmarks!
This is my collection of boards on Pinterest. I have 15 boards. The ones shown are Design, I want to do that!, love it, Food, Organization, Style. Each thumbnail is something I've pinned onto the different boards and links back to the site where it came from.
Tuesday, 3 January 2012
Mason's 3rd Superhero Birthday
Better late than never... right?! We celebrated Mason's 3rd birthday last September and I loved every part of it.
I sent out a save the date via email and had every intention of making the actual invitations.
Unfortunately, time wasn't on my side and to stay sane I sent out an emailed invitation instead:
Sunday, 24 July 2011
Where have I been for a month?!
I can't believe how fast the last month has flown by. We've been SO busy. We've had three different birthdays in the last two weeks. I've made a rehearsal dinner cake, wedding cake and birthday cake. We sold an investment house we owned in the Beaches (Toronto) and oh.... I've gone back to work (more on that in a different post)!
I have pictures of two of the three cakes. Here is the rehearsal dinner cake:
The birthday cake:
I have pictures of two of the three cakes. Here is the rehearsal dinner cake:
![]() |
| Click to view a larger picture |
The birthday cake:
![]() |
| Click to view a larger picture |
Tuesday, 7 June 2011
Father's Day Present: We {love} You
I've been trying to get this project done for 2 weeks now :s Part of the delay was due to some experimentation... I seem to be having some difficulty getting ideas out of my head and, in this case, onto canvas. And the other part is that I've started a handful of other projects and am feeling a little scattered about what to do next. Good thing I have a deadline (Father's Day) for this one!
Originally I wanted to do a series of kid-bit foot/hand prints shaped like hearts that could be framed for Daddy's office inspired by a friend who did something similar as a craft with her kids for Valentine's Day. Unfortunately, I wasn't overly impressed with my creations and felt that they'd look pretty silly - plus I know that DH is more inclined to like pictures of the kids rather than imprints of their bits. So I moved onto the next option, try a tutorial I'd bookmarked a while ago that shows how to use tissue paper to create photo-printed canvases.
Labels:
craft,
diy,
do it yourself,
father's day,
Kid-Bits
Tuesday, 22 March 2011
My Epiphany. My passion.
I've been searching for the longest time to figure out what I love to do.
I have always loved to make and create things. I have also always loved working with people. I need things that don't take very long since having 2 kids means my time is limited but also things that are either yummy (like baking) and/or beautiful (sewing/crafts).
For the last few weekends one of my best friends has come over to learn how to make fondant decorations and then fill, mask, and then cover a cake with fondant in preparation for her daughter's 3rd birthday. Then today, I spent the morning with another friend showing her how to make chocolate lollipops with initials to give as favours for her son's 5th birthday. I have worked with chocolate a little in the past, but I've never made initial lollipops with chocolate before. So I spent an hour last night doing a couple tests to find the best method.
I digress.... ! As I was saying, I love to create things (especially when there's an element of figuring out how to do it) and I love to share that knowledge (must be my teaching background). So it makes sense for me to use this blog as a way to do just that - teach people how to DIY. I know, there are lots of other craft blogs that have tutorials - but I'm certain I have ideas and solutions that other people will appreciate and find useful. I'm so excited!
Let the fun begin!
- Jacs
I have always loved to make and create things. I have also always loved working with people. I need things that don't take very long since having 2 kids means my time is limited but also things that are either yummy (like baking) and/or beautiful (sewing/crafts).
For the last few weekends one of my best friends has come over to learn how to make fondant decorations and then fill, mask, and then cover a cake with fondant in preparation for her daughter's 3rd birthday. Then today, I spent the morning with another friend showing her how to make chocolate lollipops with initials to give as favours for her son's 5th birthday. I have worked with chocolate a little in the past, but I've never made initial lollipops with chocolate before. So I spent an hour last night doing a couple tests to find the best method.
I digress.... ! As I was saying, I love to create things (especially when there's an element of figuring out how to do it) and I love to share that knowledge (must be my teaching background). So it makes sense for me to use this blog as a way to do just that - teach people how to DIY. I know, there are lots of other craft blogs that have tutorials - but I'm certain I have ideas and solutions that other people will appreciate and find useful. I'm so excited!
Let the fun begin!
- Jacs
Subscribe to:
Posts (Atom)