Showing posts with label tutorial. Show all posts

Friday, 23 March 2012

Easter Ideas

Hello!  I can't begin to explain the craziness that is our life right now.  I'm still exercising with BodyRock (albeit it's only 3 times a week) and still combing Pinterest when I have a couple minutes to spare.

Hopefully in the next few weeks I'll be able to post some pics of what we've done with our house because we're about to put it up for sale (one of the four things going on right now).  Remember the whole different carpet in every room thing when I posted about decorating the kids' rooms?  Well the rest of the house was just as bad.  But with some creative solutions and good choices we've been able to update it much more than I expected.

For now though I thought I'd share some great ideas I've found online or on Pinterest for Easter because it's only two and a bit weeks away.... yikes!

First, I'm obsessed with Subway Art.  When I post pics of our house, you'll see one I made for our living room that has important places and dates for our family.  Here are a couple cute Easter subway art printables.  Click on either image to go directly to the site where you can download them:

Source: Yeah, That's Macho & Tough
Source: Eighteen25

Saturday, 4 February 2012

Superhero Valentines

In October on Pinterest I saw cute little Hallowe'en packages to hand out at school that looked like Frankenstein, vampires and monsters.  I wasn't able to make them in time for Mason so I thought Valentine's Day would be a perfect time to try my own version.

Superhero Valentine

Mason is in a class full of boys so the whole Valentine's thing in the traditional spirit simply won't work, so what better than wishing them a 'Super' valentine with a superhero-inspired package!

Sunday, 22 January 2012

The 1 Hour Tutu


We were invited to a Superhero & Princess party at the Boulevard club on Saturday.  Mason was VERY excited to have his Batman costume back that I made for Hallowe'en and then confiscated a couple days after (to keep it safe & in good condition!).

Avery was Robin for Hallowe'en and although I LOVE her costume, I thought it would be nice for her to be her own person this time rather than part of Mason's dynamic duo.


Princess Avery was pretty easy to put together, a pink bathing suit my mom picked up for her last year, a sweet faux fur shrug trimmed with satin that I found at Value Village, tights, her sparkly pink Tom's shoes that my sister-in-law to be got her for Christmas and a pink tutu. 


Friday, 19 August 2011

A Week of Boy Wall Art - Part 4: Paper Boat + Initial

Boat & Initial 4th Birthday Present


Another one of my cousins has a little boy who just turned 4.  His name starts with a J and I know they spend a lot of time up north at various cottages so I figured that boats would be a good image to use in a gift for him.


I kept the frame & background a simple white to make the colourful letter & boat the focus.  The boat is made from layers of coloured card stock with the sails & flag at the top all lifting outward slightly so the paper fans out and shows all the colours captured from the pattern on the 'J'.

Wednesday, 17 August 2011

A Week of Boy Wall Art - Part 3: Winnie the Pooh

Winnie the Pooh Welcome Baby Gift

One of our employees, actually one of our favourite employees, had a baby boy named Isaiah a couple weeks ago.  Before the baby came, he had proudly shown me the nursery he and his girlfriend created with a Winnie the Pooh theme and I didn't remember seeing much on the walls.

Truth be told, I'm not a huge fan of character/cartoon themes but Winnie the Pooh, if it's done well, can be beautifully classic and that was my inspiration for their gift.

I love how this turned out!

Tuesday, 16 August 2011

A Week of Boy Wall Art - Part 2: Little Bees

Little Bees for Cole

My cousin and his wife had a beautiful baby boy, named Cole, and have decorated his room in dark wood and a bumble bee theme. This is what I made them for a baby shower gift.


Monday, 15 August 2011

A Week of Boy Wall Art - Part 1: Felt Transportation Wall Art

When I was putting together my little monkey's room I found it difficult to find anything that I wanted to put on the walls.  Boy wall art is very limited (in my opinion) so I designed my own to fit the theme & colour scheme.

Mason's Room


In the last while, I've been working on a number of projects for little boy birthdays, shower and 'welcome baby' gifts.  I love giving wall art as a gift because it can be individualized, it's versatile and (if it's done well) can be very thoughtful.  Plus, who doesn't want something beautiful for their walls!?

Friday, 27 May 2011

Baa Baa Black Sheep Toddler Backpack

I'm often inspired to create things when I can't find what I'm looking for in stores.  Last year I saw a little girl with a cute animal backpack and wanted something for my little guy.  When I couldn't find anything I liked I went to work creating my own.  At the time I was (and still am) in LOVE with felted wool and ended up creating about 10 different ones and gave a lot of them to family & friends as Christmas presents. 


My felted wool toddler backpacks
Everyone who's seen them has gone crazy over them but they're an insane amount of work - some of the faces alone take me 3-4 hours to do because they're all hand-sewn.  So I thought I'd test out an easier and faster craft felt version done entirely using the sewing machine.  I think it turned out pretty well!


My Baa Baa Black Sheep Toddler Backpack
(c) Jacs Of All Trades 2011


Tuesday, 24 May 2011

Hand-painted Birthday Card (no artistic skills required)


We had a birthday party yesterday morning and the night before I realized I hadn't made the card! I'm not an artist, my drawing and painting skills are pretty rudimentary but I try not to let that get in my way when I'm doing things!  This is my quick and non-artistic way to create a hand-painted card for a little boy.

Sunday, 22 May 2011

Kid-Bits Craft: Handprint Flower Bags


I was at my friend 'A's place right before Mother's Day, she always has amazing ideas and she did this really cute craft with the kids that completely inspired me.
  

I love the idea of having a piece of your little ones with you, but it's hard to find ways to do it that don't look silly on a grown-up! 

Wednesday, 4 May 2011

Planning Avery's 1st Birthday: Part 4 - Party Favours (Girls)


We have 5 little girls (not including Avery) ranging from 3 years to 6 years coming to the party.  I wanted to have party favours that would be equally appealing for all the girls and I think I've found the right mix.

For Mason's 1st birthday I put together little loot bags that I thought were cute.  In retrospect they were like any other party favour - trinkety toys in a bag that were fun for a couple minutes but would likely get thrown out when the kids got home.

Since then, I've tried to put more thought into what I pick out. For example last year I made personalized shirts for each little person who came to Mason's 2nd party.  I don't know if they got worn (!) but there was at least more time and effort put into them as well as a higher chance that they would be used afterwards.

For this party, I tried to do the same thing - choose party favours that have a little more intrinsic value.

Wednesday, 13 April 2011

Stamp It.

The Lovely Miss 'M's Napkins

As we all know, I love personalizing anything and everything.  It feels indulgent and, if done properly, screams high end.  A wonderful friend of mine (we'll call her 'M') contacted me a month ago to discuss making stamped napkins for a bridal shower she was helping to put together.  I've used stamps in the past for making cards but haven't used them on napkins. 

Her vision was to have the bride's initials and the date of the shower on each napkin.  From my experience, there were 2 options.  Order one or make your own.

Friday, 1 April 2011

Easter Buckets


I love Easter.  Easter egg hunts, chocolate, a long weekend and hanging out with your family.  Does it get any better?! 

I was in a store last week and bought a little basket ($7) for my daughter and a Spiderman bucket ($7) for my son with the intention of using them for Easter morning. 


When I got home I experienced a smidgen of buyer's remorse, not because of the cost but because I was sure I could do it better myself!

Saturday, 26 March 2011

Personalized Chocolate Lollipops


Simple.  Beautiful.  Easy.  A perfect recipe!

What you'll need:
- Merckens chocolate wafers in whatever colours you like (any brand of chocolate molding wafers will work)*  You'll have to guesstimate how much of each colour you'll need based on what you're using it for.  I found that for my small letter mold, it was app. 2 wafers per letter and app.8 wafers per lollipop top.

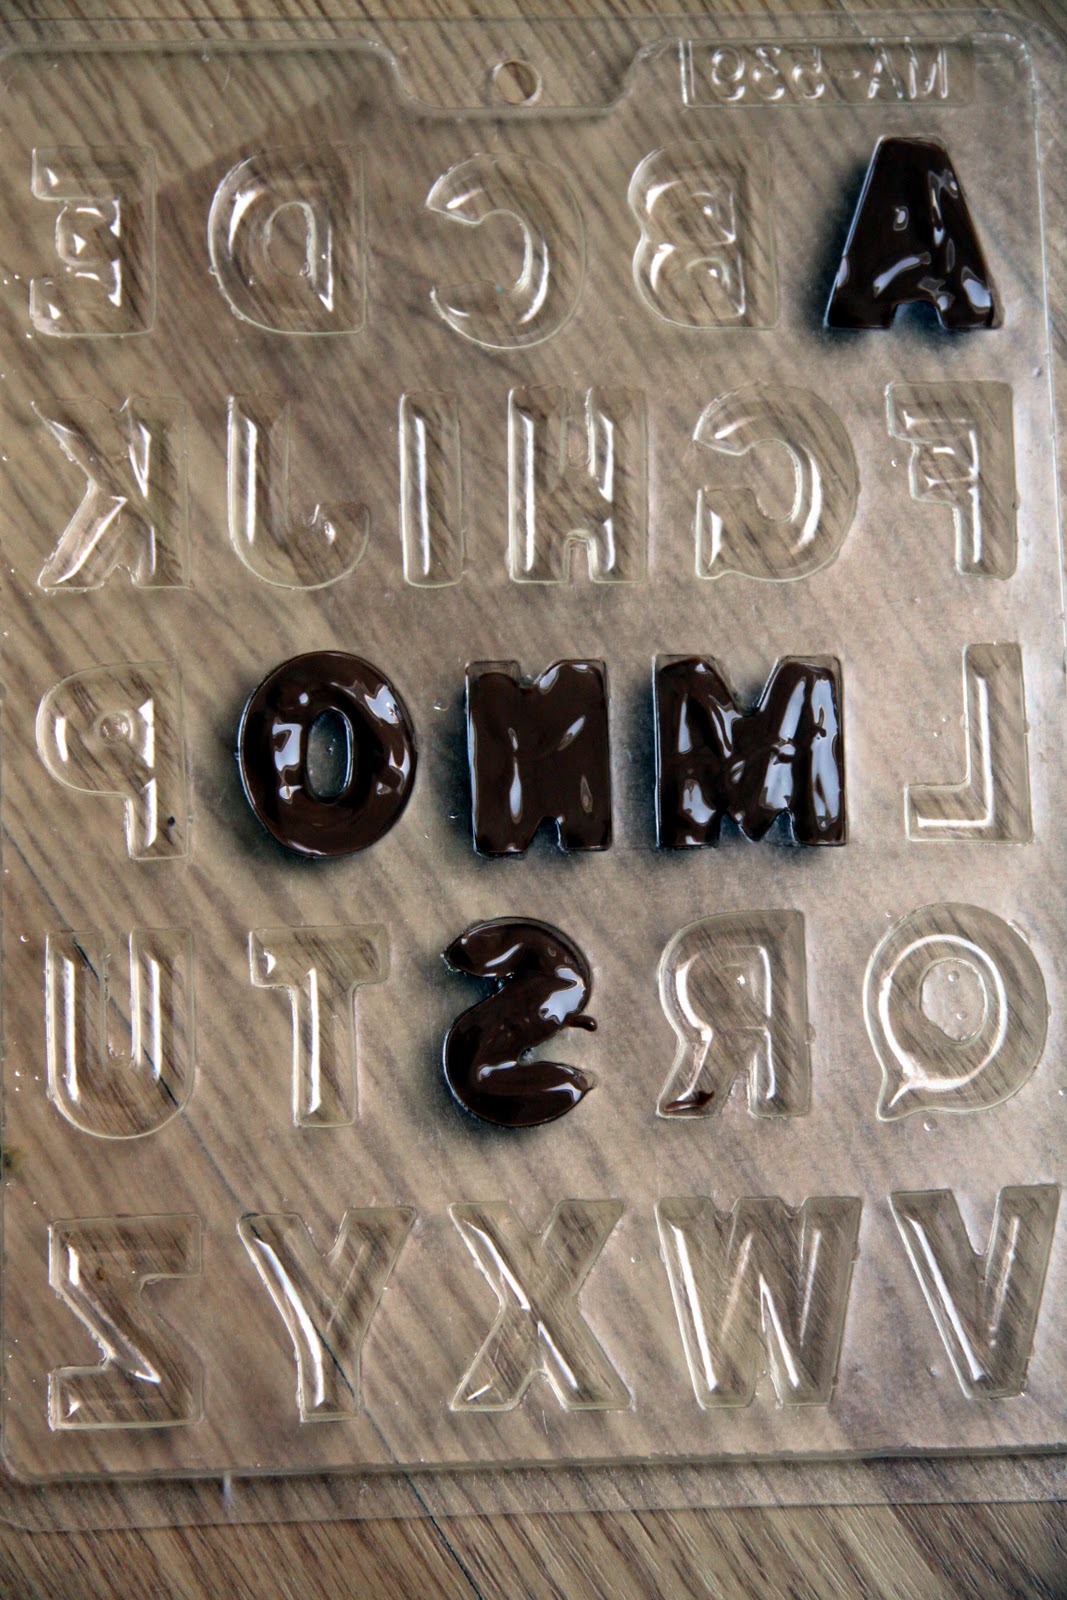
- Chocolat molds*:
  1 - letters/alphabet
  2 - lollipol top (round, square, star, heart etc.)
- lollipop sticks*
- microwaveable bowls
- spoons
- butter knife
- space in the fridge for the molds to lie flat

* I found all of these at Bulk Barn.  Cake decorating stores, like McCall's have them as well.  The total cost for chocolate, 2 molds, and lollipop sticks $20.00 and I made app. 15 lollipops with an extra 10 letters.

NOTE - if you have never worked with chocolate before it's really important for you to know that absolutely NO water can get into the melted chocolate.  If water gets in, the chocolate will seize up and you will have to scrape it out and start over.

Step 1 - Preparing the mold for the tops
If you're using a lollipop mold, you can skip to Step 2

I found a Reese's Peanut Butter cup shaped mold that I thought would make great looking lollipop tops but it didn't have a spot for the sticks.  Not a problem!


When I got home, I made a straight cut down the side of each mold.  Then, I happened to find a metal tent stake from my son's UV tent that was the perfect diameter.  I then heated one end on the flame from my gas stove (matches or a lighter will work as well).  Once it was hot, I pressed it gently in to the middle of the side of the mold keeping it in line with the cut I made.  A couple of times I didn't heat the metal long enough and had to re-heat and press until it poked through.


Then, I notched out the plastic to create some support for my lollipop stick so it would stay in place when it was in the hole.


Step 2 - Place all the lollipop sticks in the empty molds.  Make sure non are touch the bottom of the mold.  If they are, the white of the stick will show through the chocolate.


Step 3 - Place the Merckens for the tops into a microwaveable bowl.  Start with 30 seconds and stir with a spoon.  Continue heating in 30 second increments stirring each time until the chocolate is a think liquid that pours easily off your spoon.  For larger amounts, it usually takes me three to four 30 second rounds in the microwave.


Step 4 - Carefully pour in the chocolate by the spoonful until each one is 80%-90% full.  Tap the tray evenly (holding it on both sides and lifting it straight up before releasing to drop it) on the counter to remove any air bubbles and to smooth out the surface of the chocolate.


Step 5 - Place flat in the refrigerator until it's set (approximately 20 min.) and then carefully remove the lollipops from the molds.


Step 6 - Melt the chocolate in the microwave for the letters using the same method in Step 3.

Step 7 - Carefully spoon in the chocolate into each letter.  Be careful not to overfill! If you have chocolate on the outsides of the letter molds, carefully wipe it off with a dry cloth, paper towel, or your finger.  Getting rid of any excess chocolate will keep the edges of the letters clean and prevents you from having to scrape it off later.

Step 8 - Tap the mold on the counter to remove the air bubbles.

Notice how uneven the surface is after I spooned in the chocolate

After I tap the mold, the chocolate smoothes out.
Step 9 - Place it flat in the refrigerator until the letters are set (approximately 10-15min)

Step 10 - Once the chocolate is set, remove it from the fridge and give it a little twist, the same way that you twist an ice cube tray to release the ice.  Be gentle - you're just trying to loosen it from the sides.

Step 11 - Flip the mold over and tap it gently on the counter.  Most of the chocolate will fall out when you tap the mold, however some may need a little coaxing.


Step 12 - Reheat a little bit of chocolate that was left over when you filled the lollipop top molds.  You will use this as the 'glue' for the letters.

Step 13 - With a butter knife (or anything else that gives you control over where you spread the chocolate) gently put chocolate on the back of one letter.  This is will act like glue.  Place the letter in the centre of a lollipop top.  Press it down gently. Continue with the rest of the letters & tops. 


Note - the chocolate letters will start to melt in your hands if you hold them for too long.  If your hands are very warm there is also a chance you will leave fingerprints on the lollipop tops.  To prevent either of these from happening, keep your workspace as cool as possible, handle the chocolate as little as possible.  If necessary, run your hands under cold water and quickly dry them before assembling the pieces.

For a yummy and pretty variation - include candy such as mini M&Ms and mini marshmallows in the lollipop tops!