
Over a month ago I picked up an Easter Egg Decorating Kit but yesterday when the kids were having their nap I wondered if there were some other options that might be eggs-traordinary (sorry... had to!). I had no idea how many wonderful ideas I would find. It turns out that you don't have to settle for one or two colour sloppily dyed eggs.
Starting with the basics, as you may know there are two options for your eggs:
1) Hardboiled - if you plan to eat the eggs afterwards.
2) Blown (where the contents of a raw egg are removed so you're working on the hollow shell) - this allows you to keep your eggs indefinitely provided that they're stored properly each year.
If you're like me and have a hard time boiling eggs without them cracking - check out this guide from simplyrecipes.com. Or, if you'd like to try blowing them out, here's a video from monkeysee.com that shows you how.
Egg Dyeing 101 (marthastewart.com) - These instructions are based on using blown eggs
 Protect your work area with paper towels or newspaper. Mix 1 teaspoon of vinegar and 20 drops of food coloring (use more to intensify color) in 1 cup of hot water in a heatproof bowl, cup, or jar deep enough to let you submerge an egg completely.
**Notice the egg drying rack! It's made of foam board (found at most dollar stores) & straight pins**
Masking
You can use stickers, tape, or anything else that sticks to an egg to create an area where the dye won't penetrate. Technically, you could even create your own graphics (letters/shapes) using cupboard liner (the sticky-backed vinyl that you use to line drawers & cupboards) which is readily available at dollar or hardware stores. For example, a hole punch gives you small circles to create dots, paper punches give you silhouettes of their shapes, or go back to basics and cut out your own letters or images to use.
The key to masking is to make sure all the edges are firmly pressed down on the eggs and air bubbles are out before submerging the eggs. Using this technique you can get simple results like the one shown below from Better Homes & Gardens:
 |
| Source: Better Homes & Gardens (bhg.com) |
I love this use of the masking technique from marthastewart.com which uses vinyl letters and/or narrow strips of electrical tape applied to an egg that is dyed, and then the letters are shifted before the egg is dipped into a different color
 |
| Source: marthastewart.com |
Wax Resist
 |
| Source: marthastewart.com |

 |
| Source: goodhousekeeping.com |
 |
| Source: Better Homes & Gardens (bhg.com) |
 |
| Source: marthastewart.com |
 |
| Source: marthastewart.com |
I love the idea of re-purposing old items. These eggs from marthastewart.com are not only beautiful but they use old silk ties, boxers, shirts or lace to transfer their delicate patterns to Easter eggs.
Silk Eggs
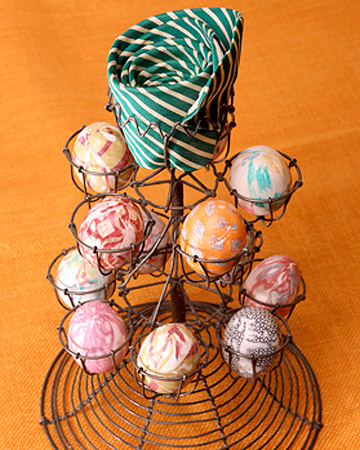 |
| Source: marthastewart.com |
Instructions
1. Cut silk into a square (or a piece) large enough to wrap around a raw egg.
2. Wrap a raw egg with a piece of silk, making sure the printed side of the material is facing the egg. Silk can still be used if it doesn't fit perfectly around egg.
3. Place the silk-wrapped egg in a piece of white sheet, pillowcase, or old tablecloth and secure tightly with a twist-tie.
4. Place the egg(s) in an enamel or glass pot. Fill pot with water to cover eggs completely. Then, add three tablespoons of white vinegar.
5. Bring water to a boil, turn heat down, and simmer for 20 minutes.
6. Remove eggs from water with tongs or spoon and let cool.
7. Remove silk from cooled egg.
8. For shiny eggs, wipe with vegetable oil after completing step 7.
Lace Eggs
 |
| Source: marthastewart.com |
Painted Eggs
Another fun option after you've dyed your eggs is to use acrylic craft paint to create different effects. The speckled eggs from southernliving.com below were created by using a toothbrush to lighly dab and spatter eggs after they've dried.
 |
| Source: southernliving.com |
 |
| Source: bhg.com |
How fun is this idea from styleathome.com?! Paint (or spray) blown eggs with black chalkboard paint. Once they're dry kids can draw whatever they like using coloured chalk. Another great way to use them is to place them at a kids' table as place cards with their names.
 |
| Source: styleathome.com |
Have fun!
- Jacs
Hello! Do you know how to make sure that your own content is unique in the web and there is no such a person who is it without making sure you are aware of it?
ReplyDelete