 |
| My felted wool toddler backpacks |
 |
| My Baa Baa Black Sheep Toddler Backpack (c) Jacs Of All Trades 2011 |
We decided to do a black sheep for a couple reasons. First, I saw an amazing tutorial for how to create a kid's rosette handbag from upcyled clothes that made me want to make something with rosettes - hard to do when you have a little boy, (there aren't too many ways for a boy to wear/carry something with rosettes) and a girl who's only a year old and can't walk let alone carry a handbag ;) And second, when I asked my little man what animal we should do he said 'Old Macdonald had a farm' - so I gave him some options and he chose the baa baa black sheep. Perfect.
Here's how I made it.
Materials:
1/2 meter black felt
1/2 meter light tan felt
1/3 meter lining material - lining is important to use with craft felt because it wouldn't be sturdy enough on its own
dark grey embroidery thread
glue gun
scissors
sewing machine
1) - I google imaged a sheep face. I chose the one below and then did a quick sketch to get a feel for the basic shapes of the face.
2) I cut a template for the pack & straps out a piece of my son's craft paper.
I made the pack 12"x12" but then tapered it at the top by 1.5" on each side (I just like this shape better for a little body, it helps keep the straps in the right place when they're wearing the backpack) so it's 9" at the top and 12" at the bottom.
The straps are 14"x3"
Then I folded the light tan felt and placed the bottom of the pack template along the folded edge then cut along the sides and top. I repeated this step with the lining material.
After that I cut 4 strap pieces - 2 in light tan felt and 2 in the lining material.
3) Using my little sketch and the pack template to judge how big to make the face, I did a rough drawing of the sheep face on another piece of paper. Once I was happy with it, I used a marker to define the exact shape of the head. Then I created an ear shape using the same technique (comparing to the existing templates to judge size).
I cut 2 of the face shape (1 in light tan felt and 1 in black felt) and 4 ear shapes (2 in light tan, 2 in black).
Then I cut the following pieces just by eye balling it:
- a tapered rectangle shape with rounded ends for the centre of the face in the light tan and cut out tear drop shapes for the nostrils
- 2 eyes in black
- 2 tear drops in black to go behind the nostrils
When I was done cutting these are all the pieces I had ready to start my sewing. The thin black strips are what I used to create the rosette wool on the face & body. The body pieces (light tan felt & lining) are folded in half at the bottom in this picture - just so there's no confusion!):
 |
| All the pieces cut & ready to sew. |
4) Sewing
a) Straps - place the material right sides together for each strap. Sew 1/2" seams on each side and then flip it right sides out. Finish by top stitching 1/2" from each edge.
 |
| One finished strap. |
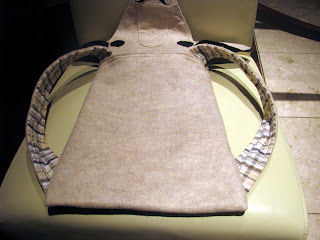
b) Body - place the felt & lining right sides together and stich as closely to the edge as possible along both sides and one end, leaving one end open. Then flip it right sides out.
 |
| The body of the backpack with one end left open. |
c) Sew light tan felt ear onto the black felt ear. I ended up cutting app. 1/2" off one side of each tan ear before I sewed them. This gave the ears more dimension when placed on the finished face.
 |
| The ears after they're sewn. I've flipped and pinned one to create a more realistic shape. |
d) Sew the centre face piece (tapered rectangle) onto the tan felt face - remember to place the black tear drop pieces behind the nostrils before you begin! Sew on the eyes then hand sew the grey embroidery thread along the curve of the mouth and straight up through the centre towards the nostrils (I did this after the backpack was put together but wish I'd done it in this step because then the ends would have been hidden, sandwiched between the face pieces.
Once that's done, place the black felt face behind the tan face. Fold the ears slightly at the top and place between the two face pieces on each side. Secure with pins and sew around the outside of the face.
 |
| The face. |
e) Fold down the opening of the body/pack app. 1/2" and place one end of each strap and the face between the lining and the felt. Sew straight across the felt to secure the straps and face between the two pieces. I ended up sewing 2 lines across the back for reinforcement.
Be careful during this step to give yourself at least 1/4" between the side of the strap and the body because you're going to sew the edges of the body together in the next step and need a bit of seam allowance to do that. Also, notice that the straps are opposite from the rest of the material - the lining is facing up and the felt is facing down. This is done so that when the backpack is finished the straps have the felt facing out.
 |
| Straps & face pinned in place between the felt & lining of the opening. |
 |
| After it's sewn together |
f) Place the body felt sides together (so you should only see lining before you sew) and pin the bottom of the straps near the bottom of the bag. You'll see a small rectangle peeking out of the edge. Do this on each side and sew straight down both edges. I tried to keep my line app. 1/4" from the edge but if that's too tight for you, increase it to 1/2". Then flip it so the lining is on the inside to make sure everything is sewn properly.
Be careful in this step that the straps aren't twisted before you sew them into place! When I place the straps between the sides I fold the bag and compare to make sure that they're in the same place and have the same amount of material poking through. This ensures that the straps are even.
 |
| Comparing the ends of the straps to make sure they're equal in every way. |
 |
| All sewn in! |
g) Last step - this is optional. If you want to give the bottom of your backpack more squared off corners, flip the bag inside out and pinch the corners to form a triangle. Sew across the triangle. Do this on both sides.
 |
| The red lines show you where I sewed my corners. |
 |
| From the outside of the bag. |
 |
| All ready to get rosette wool! |
5) Rosette Wool - I don't have any pictures of how I did this. It was very unscientific! Basically I plugged in my glue gun and then started to cut 1/3" to 1/2" strips of black felt and then cut the strips into various lengths, none more than 6" long. One by one I 'twiddled' them (twirled them into a corkscrew shape) and wrapped them around my finger to create a round rosette shape and then pulled my finger out and tucked ends into the centre. After, I put a circle of hot glue on and pressed on a rosette in whatever spot I felt should have one on the face & body. Some of them weren't perfectly secure so I went back and added a little more glue in the appropriate spot and stuck down the loose pieces. I left some loose though - I liked the fact that they weren't all perfectly in place.
You could easily make this a white sheep by making white rosette wool.
 |
| My little guy will be 3 in September, but he's as big or bigger than most 4 year olds already. |
 |
Here are 2 pdf files to create the head - one of the face/ear/eye & the other of the nose.
This tutorial & pattern was created for personal use. Please don't sell any backpacks based on this design. Thanks!
- Jacs
Linking up at:
 |  |  |
 |  |


Gorgeous! You're so very talented dear friend. I would love the PDF.
ReplyDeleteElle
Thanks Elle! I'll have it up in the next couple days - we don't have a scanner at home so I'll ask DH to do it at work :) I'll send you a quick message when it's done.
ReplyDeleteWow, that looks amazing! I can't believe you can get that done in under 4 hours, I think it would take me 4 weeks and still not look anywhere near as good
ReplyDeleteThanks Karen! You are very kind :)
ReplyDeleteThat is just adorable!!!! You are very creative.
ReplyDelete